
Driving a manual ATV for the first time is a daunting task. The most common questions we receive include: How do I get started, how do I change gears, how do I avoid stalling? Ask any 10 guys, and 9 of them will tell you stalling an ATV is more painful than crashing it.
Understanding the basic components of the ATV manual transmission, as well as a few easy to learn techniques can have you up and riding in no time. Safely too.
How an ATV Manual Transmission Works
To give you a full picture of how a manual transmission works on an ATV, we are going to assume you have little working knowledge of how a transmission works in general. No offense, it’s just easier that way.
In short, a transmission adjusts the rotational speed of the engine, which in turn changes the torque and speed of the ATV. It mounts directly to the crankshaft and through a set of internal gears it can either adjust the speed down for more torque, or up for more speed.
A manual ATV requires the drive to “manually” adjust the gearing through a clutch and gear selector. These two parts distinguish a manual transmission from an automatic. It is important to know how these parts work in tandem (with the throttle) to operate the ATV smoothly and safely.
The clutch is a set of rough discs that when engaged grip together connecting the rotation of the crankshaft to the transmission. Disengaging (or opening) the clutch pulls the discs apart allowing the engine and transmission to rotate separate from one another. This is done when shifting gears and braking.
The gear selector does exactly what the name implies, it selects your gear. It’s a bit different from a manual transmission in most cars because it works sequentially meaning you have to go through each gear to get to the next. In a car, neutral is between all the gears so you can go into any gear but in an ATV transmission neutral is ONLY either before first gear or between first and second gear.
Here is a good visual representation of the ATV manual transmission components:
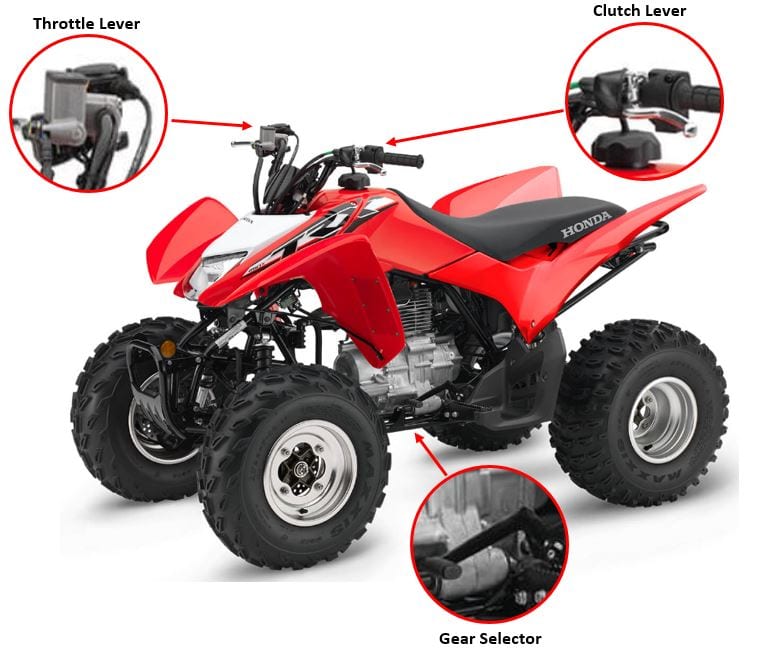
Throttle Lever – Located below the grip on the right handlebar, the throttle controls the power output of the engine. The throttle lever is spring loaded so it returns to idle position when released.
Clutch Lever – Located behind the grip on the left handlebar, the clutch lever engages and disengages the clutch. Pulling the lever disengages the clutch allowing the rider to change gears. Releasing the lever engages the clutch and allows power to be transferred to the wheels.
Gear Selector – Located slightly above and forward of the left foot peg, the gear selector allows you to change gears while the clutch is disengaged. Using your shoe toe, you can lift up on the lever to go up in gears or press down on the lever to go down in gears. The gear selector moves above an inch in either direction from its normal position, and a new gear selection can typically be heard with an audible click by the selector lever.
Starting the ATV Properly
The first step in driving a manual ATV is getting it started, as you would expect. The manual transmission has a few prerequisites we must check off before we can push the start button (or pull the recoil starter).
Starting a manual ATV requires three steps, the first of which is opening the fuel petcock. This is usually located below the gas can and sometimes is molded into the plastics. It should be rotated so that gas flows freely between the gas tank and the carburetor. There are usually identifying marks on the petcock that say “open” or “run” and “close”.
Secondly, you need choke the carburetor if cold starting the engine. The choke (typically located on the handlebars or attached to the carburetor) can be activated by pulling the slide out or sliding to the right, depending on the style you have). Choking the engine reduce the amount of air which enters the engine without changing the fuel flow. This creates a rich fuel/air ratio allowing a cold engine to start and get up to temperature quickly.
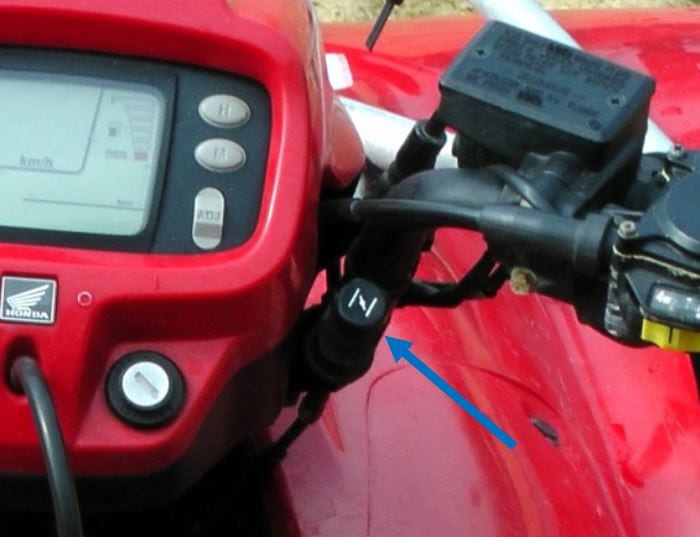
Lastly, and probably most importantly, the ATV needs to be in Neutral or the clutch disengaged before starting. We always suggest starting in neutral, so both hands can be free to get yourself set before driving. Neutral is most often located at the bottom of your gear set, or between 1st and 2nd gear. To check for your neutral location, you can push down on the gear selector with your left foot until you reach the bottom gear. With the ATV off, try pushing it forward. If it moves, you are in neutral. If it won’t move, that is first gear in which case you should lift up on the gear selector lightly with your left foot until you hear a click. This should be your neutral. It takes a special touch but with practice most riders can find neutral easily.
With the gas on, carb choked, and transmission in neutral the ATV is ready to be started!
Stopping and Slowing a Manual ATV
Before we dive into how to drive a manual ATV, we need to address how to stop or slow it safely. ATVs drive at high speed with little protection for the rider. While getting up to speed and shifting through gears is the most difficult aspect for most new riders, improper stopping is the most common reason for injuries.
All ATVs should be fitted with two braking systems which function separate from each either. The front brake is similar to a brake you would find on a bicycle. It is located behind the right grip from the rider’s perspective, and is activating by pulling toward the handlebar. This is your most effective brake because it stops the front wheels which experience the most momentum while braking as the weight of the ATV and rider shift forward.
The rear brake is located by your right foot, and can be activated by pushing down with your toe. This brake activates either a drum or disc brake on the rear axle, and is the typically used in conjunction with the front brake to limit forward roll while braking.
Important Note: Unlike an automatic transmission, you must disengage the clutch when braking hard to avoid stalling the engine. If you are braking lightly and intend on staying in the same gear, the clutch is not required, but when braking suddenly or slowing so much that you will need to downshift, the clutch should be disengaged while using either brake.
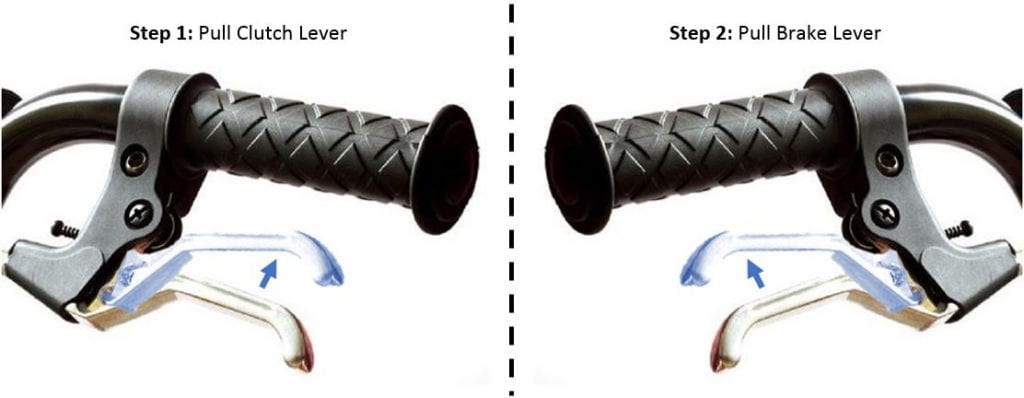
Most riders prefer to use the front brake for stopping because it is usually more effective and they prefer a brake which feels more natural. Because you have to disengage the clutch to brake, grabbing both levers with your fingers feels natural than using your left hand and right foot. The rear brake is typically only used in conjunction with the front brake to slow the ATV without causing the vehicle and rider from launching forward during hard braking.
Accelerating from a Stop
This is the step that separates the boys from the men. Being able to drive your ATV without stalling is a difficult task to do when you haven’t done it before. It takes an exact amount of gas, a fine touch for your clutch, and quick reaction to keep from launching forward or stalling. There are a few tips you can learn that’ll help you get riding.
An ATV will stall when the weight of the quad and the rider are not sufficiently overcome by the directional force produced by the engine. As we discussed before, the crankshaft is connected to the transmission which then connects to the axle and wheels. This is referred to as the powertrain. When a stall occurs, the piston’s movement is stopped by the resistance the rider and quad put on the drivetrain. Too much resistant and the engine is unable to continue rotating and stalls. Because an object at rest wants to stay at rest, getting forward momentum causes the most stalls.
You can overcome a stall through proper throttle and clutch engagement. The throttle should be pushed to 25-50% of its range, revving up the engine and building enough momentum through rotational mass to overcome the weight of the rider and atv.
While pressing the throttle, your left hand should be releasing the clutch slowly natching the position of your right thumb. So if you are giving 25% throttle, your left hand has released the clutch lever 25%. Once you feel the clutch starting to grab and the ATV rolling, start releasing the clutch at a faster pace to keep from grinding the clutch plates. The ATV will start moving and you can focus on controlling the speed with the throttle lever, releasing the clutch completely. You have now passed the hardest step and you are driving a manual ATV.
Upshifting a Manual ATV
Once you are comfortable starting and driving a manual ATV from a stop, it’s time to shift into higher gears and pick up speed.
Before you get up to speed, it’s important to know what to do should you want/need to stop suddenly. While your front brake is the most effective brake, pulling the lever quickly at high speed will cause an extreme shift of weight forward onto the front tires and can cause the rear wheels to come off the ground and the rider to come off the quad. So we always suggest you anticipate the actions of others and know the path/road you are traveling to minimize any surprises. Should you have to make a quick reaction, you should apply both the front and rear brakes with your right hand and foot which will limit the shift of weight and keep the tires planted on the ground.
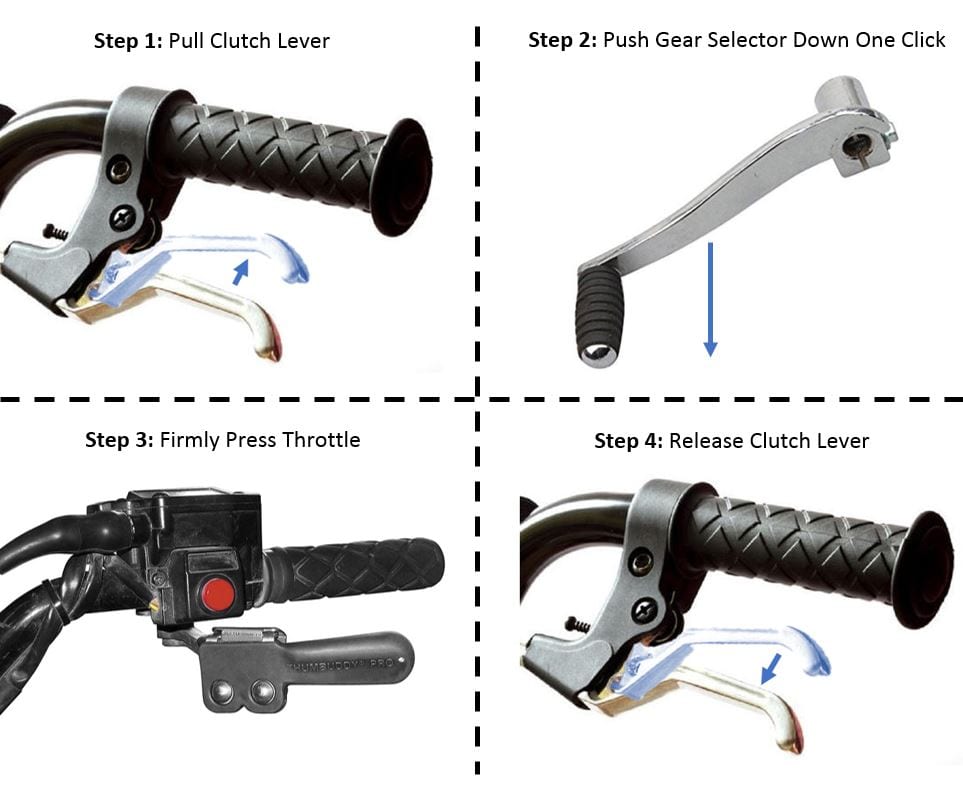
Now that you’re riding around in first gear and comfortable controlling the throttle, we can perform our first gear change. Gear changes should occur whenever the engine is outside of its powerband, the RPM in which the engine produces the most power and torque. Ideal gear changes should occur when the current gear RPM passes the peak power output and the next gear RPM is within the lower end of the powerband.
The next set of moves should be performed in sequence to ensure a smooth gear change. The faster you can perform the steps, the smoother the gear change will go and more speed you will maintain.
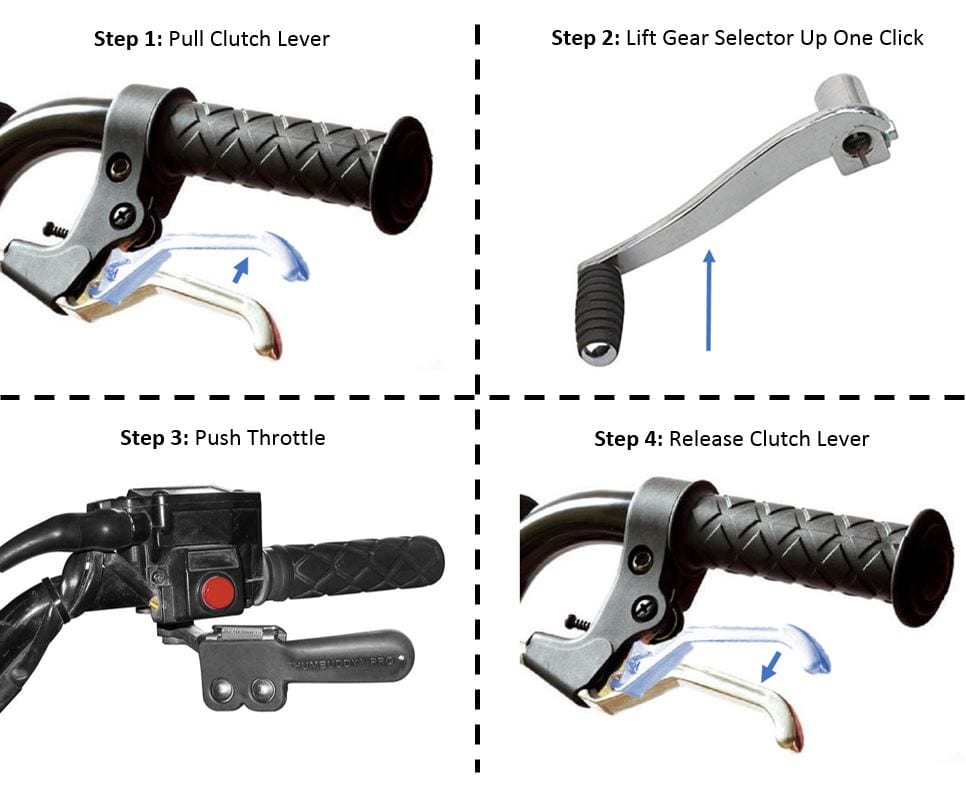
First, pull the clutch lever with your left hand to disengage the clutch. With the top of your left foot lift up on the gear selector one time until the lever clicks. The four wheeler is now in a new gear so we need to match the RPM of the engine to that of new gear. This takes time and experience to master, luckily though the rotation of the tires makes stalling between gear changes unlikely. The engine RPM at the time of the gear change will determines how much throttle movement you should apply. Changing gears in the middle of the power band will require less throttle in the near gear because you’ll need to match a lower RPM. Changing at the top of the powerband will require more throttle after the change. Simultaneously to pressing throttle, your left hand should release the clutch at the same pace in which you are pressing the throttle. The first few gear changes will be jerky at best but after practice you’ll be able to match engine speed with gear selection, and the shift will be smooth.
Downshifting a Manual ATV
There are two options when slowing or stopping on a manual ATV depending on your next action. The most common and easiest method is just pulling the clutch lever to disengage the clutch, and using the brake(s) to slow down or stop without worrying about your gear selection. This is best used when coming to a complete stop because it works regardless of your current gear and allows you to stop quickly.
If you are just slowing down for a turn, jump, hill, etc and plan to accelerate after then you should downshift into a lower gear. As you slow down, your quad will stay in the powerband and allow quick acceleration when needed. The steps to downshift are the essentially the same as upshifting aside from two actions. Instead of using the top of your shoe to lift the gear selector level, you will use the bottom of your toe to push down on the lever to go down a gear. Additionally instead of shifting at the top of the powerband, you downshift at the bottom so that you will be at the top of the powerband of the lower gear. Because you are entering a new gear at the top of its range, you will need to give the engine more throttle to match the RPM.
Parking a Manual ATV
So you’ve mastered everything else, and now you’re ready to park your ATV. Like starting the ATV there are a few steps you need to complete to make sure it stays put.
After completely stopping, the ATV should be put in neutral and the clutch lever released. The front brakes on the right grip should have a latch which locks the lever in place and turns the brake into a parking brake. The on/off switch can then be set to off, turning the engine off. Remove the key, and turn the fuel petcock to off.
If parking on a hill, face the ATV so that the front it point up the hill. Apply the parking brake and put into 2nd or 3rd gear. The mechanical advantage of the transmission gearing and engine compression will help keep the quad from rolling down hill.